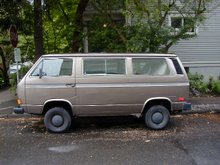
I had been looking for a diesel engine to put in place of the 2.1 gas engine that comes stock in the later Vanagons. First I looked at the 1.6 and 1.9 Turbo Diesels, 1.9 TDI and 2.5 TDI.
The 1.6 TD is a bit low on power and the TDI's have too much electronics, I wanted to keep things simple, easy to repair and be able to run it on veggie oil.
I owned an Audi 5000 TD before and I really liked the 5 cylinder engine, it is based on the 1.6 TD, this engine revs fairly high, it's redline is about 5000 rpm, so this is comparable with the gas engine that it is replacing.
I started looking for one. Two months later I saw a 1983 Audi 5000 2.0 Turbo Diesel engine on Craigslist and picked it up in Olympia WA, the seller also had a SA bell housing to bolt this motor to the Vanagon Transaxle for sale for $175.00, so I bought this also.
After disassembling the engine, I found out that this engine had a lot of miles on it, I ordered 5 new pistons, had the block hot tanked and bored , rods re sized and crankshaft ground. The cylinder head had cracks between the valves, which is common, but the seats were corroded and needed to be replaced.
I milled out the cracks and welded the head, installed new seats, valve guides, valves and seals. Also, I installed a steel head gasket that is standard on the 2.4 Eurovan diesel. The head gaskets are a weak point on all early VW, Audi and Volvo diesels, so I am sure this will improve the reliability of this engine.
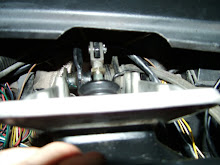
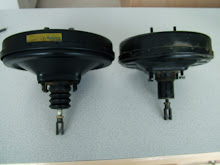
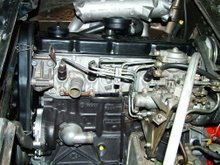
The Audi 5000 engine uses a vacuum pump that is bolted to the end of the cyl head to provide vacuum for the brake booster, this is driven by a belt. The problem is that it makes the engine longer and in order to set or check the injection pump timing, the pulley and belt have to be removed.
VW uses a diaphragm pump on the Eurovan diesels and it is run by a push rod that rides on a cam lobe. The whole pump is bolted to the side of the cyl head between the injectors.
I drilled all the mounting and push rod holes. So I got rid of a belt and ended up with more space in the engine compartment.
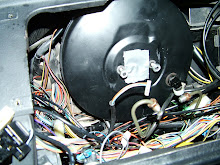
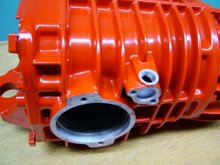
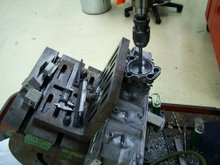
I powder coated all the sheet metal, and made a connector in the sump for an oil pre-lube pump.
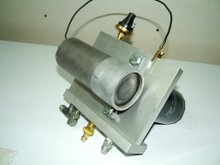
Audi 5 and Volvo 6 cyl diesels have a history of engine wear during cold starts, the oil pump is located right behind the crank pulley, so it is a long way to the back of the engine.
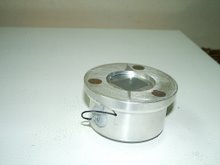
To solve this problem, I have installed a pre-lube pump that takes oil from the crankcase, pumps it through an oil filter back into the engine. I took a 12volt pump that is normally used as backup on hydraulic brake boosters of trucks and school buses.
It is mounted on a thick aluminum plate that has internal oil passages drilled in it, I also added two VW spin on oil filters, one for engine oil and the other for transmission fluid.
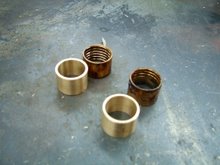
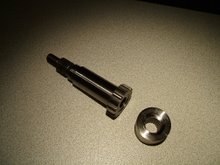
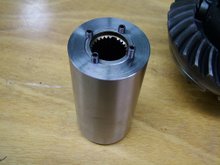
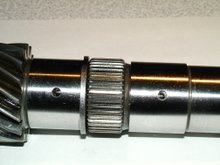
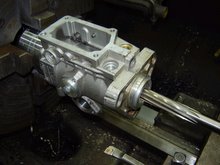
The injection pump that came with this engine had a lot of shaft wear and this is probably the reason that it ended up for sale. It will suck a lot of air into the pump instead of fuel, it causes hard starts and loss of power.
It has two bushings in it that are about 3/4" apart. I made an one piece bushing out of bronze, pressed it in and machined it close to the size that it has to be, then reamed it to its final size.(17 mm on this pump)
Reseal kits are easy to get, bought mine on EBay for about $20.00, it includes all washers, O' rings and a shaft seal. It is not hard to install and should last me for years.
Saturday, February 17, 2007
Subscribe to:
Post Comments (Atom)


32 comments:
I have been looking at this engine conversion from about two months. I was asking if anyone had done one before. I am happy to find this one. What tips can you give the rest of us? And was thsi the Audi 100 TDI 5cyl?
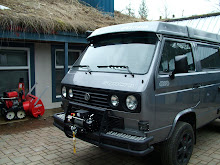
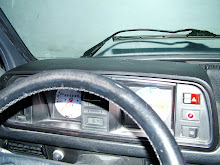
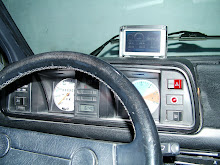
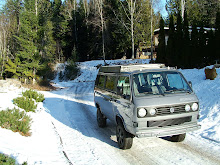
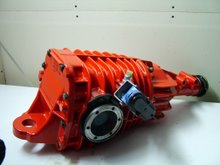
This engine is not a TDI but the earlier indirect injection version. Easy to fix and maintain, it shares a lot of parts with the VW 1.6 TD and the Volvo 2.4 TD.It bolts up to the South African Vanagon bellhousing and also uses the SA engine support bracket. Both are available on the web. The only change that I had to do to the engine compartment was to cut out a small section of the metal lip that the engine cover seals on.
This because I wanted the engine up as high as I could get it for ground clearance. It will fit in there unmodified if it hangs a little lower.
A lot of people install the 5 cyl gas version of this engine in the Vanagon also.
Herman,
Can you point me to the supplier of the bell housing and engine support for the 5cyl Audi?
http://www.vw-winkler.de/
This is in Germany,they have an English section, you can read up on it and check out Ebay, I have seen the bellhousing and engine support bracket for sale once in a while.( Bellhousing for around $500.00 and the engine support for around $320.00)
Fantastic clean work!
The bellhousing seems a bit overpriced though.
Wouldnt it be possible to machine up an adapterplate between the Audi engine and the standard gearbox/bellhousing?
Thanks Jan, Yes it is a lot of money,you could make your own if you have access to a lathe, I was planning to do that before I ran into my SA bellhousing.
Another option would be to buy an adaptor plate from Kennedy Engineering,they have a kit for the 5 cyl and VR6 engine, but I haven't checked their prices lately.
Wow! Impressive work!
Hi Herman, really cool project you have there and really clean work as well! I have an 87 Syncro that i recently broke 4th gear on and Im hanging on to it so I can do an engine conversion like yours. i was first onto the Audi 5cyl gas (drove one 100mph and was highly impressed) then swayed toward the Subaru 2.5 conversion. recently i came accross an Audi 5000 diesel and biodiesel is really where i want to be so..... thats how i found your site/blog, when i was researching the Audi 5000 diesel engine. im down here in Cali and can do fab and machine work like what you are doing. im real curious about how that thing fits in the engine compartment and also want to turbocharge. wondering if you have any more photos you could email me directly so i can start figuring this thing out. ideally i would like no less than 150hp (if that is at all possible) with a larger foot torque pound rating (say 200). any knowledge you can share would be greatly appreciated and reciprocated.
thanks, Chris
Thanks Chris, Yes I will run biodiesel in mine too.
I will keep the horsepower around 110-120, you can get more than that but I like to keep the engine together for a long time, it is also better for the transmission.
I have the same engine in my 1985 Audi 5000 winter beater and it goes really well for a stock 88 hp engine.
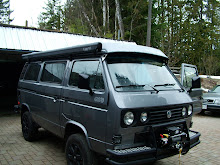
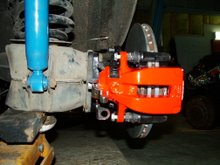
In my van, because I like to have a lot of ground clearance, I had to take a little bit of material out of the engine bay where the power steering pump fits, so the engine lid has to come up a bit too, everything else will fit.
I made my own engine carrier out of square pipe and made a HD clutch slave cyl bracket.
I guess that the Audi 5000 engine that you have is N/A, you could add the piston oil sprayers, use some sprayers from an Audi gasser Turbo engine and machine openings in the block for them, you will also have to buy new pistons with the sprayer cut-outs for your motor, a turbo injection pump and a turbo charger with manifolds.
A pyrometer is also important so that you can keep an eye on combustion temperatures.
I will add some more pictures on my blog.
http://picasaweb.google.com/itzdshtz/VanagonSyncroProject02
heya Herman, i have been trying to reply to your reply via gmail but with no luck (11 attempts). it just kept getting kicked back to me. i wanted to send you some pics of my syncro and trade some notes with you but didnt want to do it here on your blog. my direct email is chris@kellybike.com if you dont mind hitting me with an email so we can correspond that would be great!
best to ya, Chris
I am ready to buy this engine. Now that you have the van operating how is the power? Do you feel it is underpowered?
Hi gator70, I don't have my van running yet.
We had 3 major overhauls this year in the powerplant,so I lost about 14 weekends that I could have worked on the van.
From what I have read on some German Forums, a lot of people see this as the ideal conversion for a Vanagon.
I have this engine in my 1985 Audi 5000, totally stock in a 3300 pound car and it runs great.
With an intercooler and a bit more boost, it should do fine in a Vanagon.
Before you buy an used engine, pull the head and look for cracks between the pre-combustion chamber and the valves, small cracks between the valves are OK.
I have 4 heads here that have major cracks, so check before you buy!
I am going to buy the engine. Thanks for the tips. Did you build your own harness? Can you explain any of that to us? How did you run the exhaust? And can you post a pic some day of the cut out on the sheet metal you made to get the engine high in the engine compartment?
BTW: I am buying the engine, and I am unsure what Audi model car it came from. Do you know? It is the same one as yours.
Hello Herman,
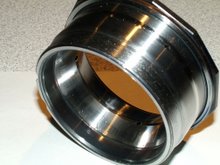
Did you need to change or modify your fly wheel? I'm also looking into the option of the bell housing. Like it a lot more then an adapter plate. But I'm not sure about the fly wheel. There is not info on the net.
Thanks, BART
Hi Bart, yes I did machine my flywheel, it came off an 5000 gas Turbo engine.
I used an Audi A6 pressure plate and machined the flywheel a little deeper so that it would fit.
I used the Turbo Diesel clutch plate but I am still trying to find a plate that has a larger diameter and the right splines in it.
Update, I ended up using the flywheel and pressure plate from a Vovo D24 (Audi TD is the same)because the throwout bearing had some clearance but not enough to compensate for clutch wear when the clutch plate gets older.
I had to do a bit of grinding inside the bellhousing, some of the pressure plate rivets were just rubbing a bit.
The Volvo clutch plate has more splines and will not fit!
Nice progress I´m checking back often and enjoy the updates!!
Do you have any drawings with measurements of the engine mount you could mail me at jan.kjerbye@gmail.com ?
I´m considering the 2.0 TD LLK upgrade for my original Tristar Double Cabin.
Thanks,I will take some measurements and Email them to you as soon as I have some time.
Herman have looked at the blog a few times and have been very impressed. My own syncro has been extensively modified. Not by me however the boys at syncronutz in Scotland have done the work. Have a look at the front bumper. The whole lot has been cut off and moved back and up 4". The wheel arches made bigger and the van raised by 2". It is in getting the 1.9 TDI (mechanical pump.) If your ever in Scotland look me up and I'll show you some of the sites. Some pics here http://gallery.mac.com/kombiman#100031&view=grid&bgcolor=black&sel=14
Hey slobbo, great looking Syncro! They have done an exellent job on it!
Love to see it some day, Herman
Hello Herman,
My current project is converting my Syncro to take the Westfalia interior and roof, and I noticed 3 photos in your album of such a roof conversion. Do you have any more clearer photos and any notes or tips of this conversion that you could send to me at rrmossatxtra.co.nz before I make a hash of it? Regards,
Ralph
Hi Ralph, those were the only pictures I had about the roof.
I cut the roof section off that had the opening in it and cleaned it up, all the brackets etc that were spotwelded to the underside were taken off.
Then I transferred the new section onto the vans roof and outlined where I had to cut it, I cut out just the opening.
You can see on the picture how I cleaned up the Westy roof, then I hammered the area a bit down where the hinges fit, so that I could put a 1/4" thick strip there and welded it in place. This is so that I could drill and tap the bolt holes for the hinges.
Next I drilled small holes all around the new roof section so that I could plug weld the new roof section in place onto the old roof.
Then I welded the inside with spotwelds, a bit of bondo on the seams and it looks original.
The nice thing is that it adds an extra layer of metal to the roof to reinforce it, it only raises the roof about 0.060".
Some people cut off the entire roof and weld a complete roof back on, others remove the whole roof sheet metal and replace that. I thought that this was the easiest way.
Cheers Herman
(I tried to send you an Email but it came back)
hi Herman
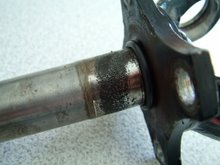
I have my driveshaft at the machine shop they asked me to what point of thighness should the brass bushings be machined to. They mentioned something like press fit, thight fit, or whatever fit. sorry, i don't remember the terms.
Pedrokrusher@yahoo.com
Pedro
Hi Pedro, the outside diameter should have about a 0.001" pressfit and the inside diameter should have about 0.002" clearance.
Cheers Herman
Hi Herman -
I just bought a 1981 Audi 5000 Diesel and am trying to track down some pistons and rings (there is smoke coming from the dipstick, and compression is ranges from 190-290 PSI in all cylinders, so I'm guessing it's worn rings)
Any ideas on where to get pistons / rings / etc for these old engines?
Any help appreciated! Very cool project - thanks for sharing!
Hi Jon, sorry for the late reply,was out of the country, no Web access.If you are on a budget you can look for some pistons here:
http://www.dieselvw.com/
I assume that you have a non turbo charged engine in your Audi so any VW 1.6 diesel piston will fit in there. If it is a TD than you will have to watch that the new pistons have two cut-outs in the skirt for the oil nozzle.(Audi 2.0 TD nozzles fit on the opposite side)
Make sure that you also change the timing belt, waterpump and idler while your in there.
Herman
Hi Herman -
Thanks for the info - They have a ton of good stuff!
Good luck w/ the hydrogen generator - that looks interesting too!
- Jon M.
I like your project and hope to do something like that with my westy down the road. I have the 2.0L in an audi cgt which will end up in the westy after I find a bell housing. Just have a question about the eurovan headgasket. Did it fit on the 2.0L block alright or is there any mods to do? My head gasket gave out today and I would like to go to a steel one and maybe ARP studs as well as I'm running slightly more boost than stock (with EGT and boost gauge of course).Thanks in advance.
Alex.
Hi Alex, the stock Eurovan 2.4DIESEL headgasket will fit without any mods. There is one extra hole in it and a small part will stick out outside of the block but there is no opening there in the head nor the block. The cyl bore in the headgasket is slightly larger but it should not change the compression ratio much and carbon will fill it up.
They don't have to be re-torqued after 1000 km either, make sure that the mating surfaces are clean and flat.
Cheers Herman
Hey there just found your blog and you are doing a lot of things that I am looking at doing, wondering if you would be able to send me an email with some info about your bumpers and some other things.
If you can send me an email at hurleyandthegoose@hotmail.com that would be great!
Herman, I see the pictures of the "Prelube Pump" and the oil pan with the holes drilled and fittings attached but I still don't understand the details. Is the auxiliary pump always running, or just a start-up? Where are you pumping the oil back into the engine? Into the head? Through an existing fitting?
I am just starting to gather parts to put this same 2.0TD into a 1987 Quantum Syncro Wagon and want to be certain I solve any oil starvation problems before installing the engine. J.D. in Reno, NV
Awesome rig! Do you mind telling me that paint code? looks great! sk8mike2@comcast.net
Post a Comment