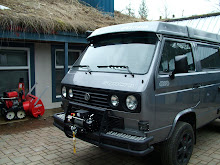
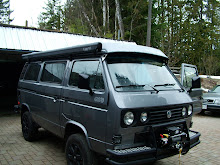
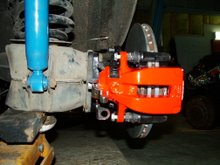
After I installed my extended front shock absorbers, the upper A-arm moved down quite a bit and the ball joint angle became too steep, the rubber boot kept popping off the joint.( I have about 23" between the hub center and the fender, unloaded)
Also it looked like I ended up with too much negative caster.
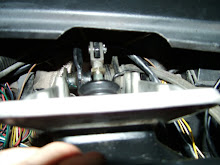
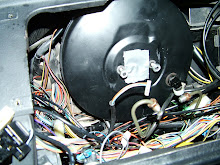
I made a spacer that bolts in between the joint and the upper arm, it moves the arm up a bit and it also tilts the ball joint.
There is a retainer plate that secures the spacer in place with one bolt through the center and two bolts through the original ball joint mounting holes.
I may have to make a different one later as I have not done a wheel alignment yet.
Saturday, July 14, 2007
Saturday, May 19, 2007
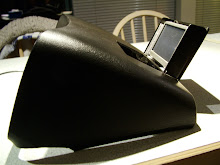
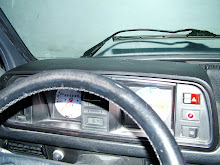
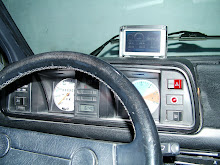
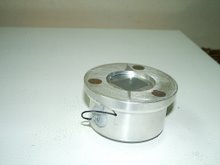
Laser Alignment Tool
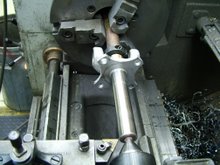
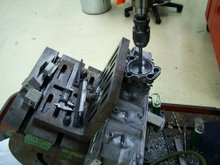
On the Syncro's it is hard to align the engine and transmission with the front differential in order to minimize driveline vibrations.
The engine has to be mounted slightly offset to one side so that the driveshaft sits in the center of the frame.
To make this easier to set up, I have made an aluminum hub that holds the laser, taken out of a laser level, and has magnets on the flange side so that it just sticks to the driveshaft flange.
I can now measure the distance between the frame rails and the centerline to make sure the engine and transmission are square with the frame and at the same time aligns with the front differential center flange.
Saturday, March 10, 2007
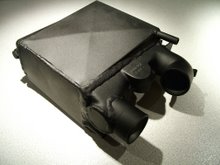
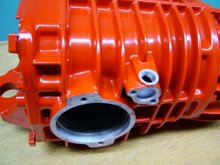
Intercooler
The intercooler that I use comes from a Saab, it is an all aluminum cooler that I have welded a water jacket around. I also had to cut one of the elbows off and weld a straight connector on.
It fits behind the left taillight and it keeps the hoses to the turbo and intake manifold really short.
I will be using an air conditioning evaporator mounted next to the Vanagon radiator with a cooling fan, the fluid will be pumped around by an electric water pump through the engine oil cooler, transmission oil cooler and then through the intercooler.
This way I don't have to run hoses for 3 coolers to the front.
Saturday, March 3, 2007
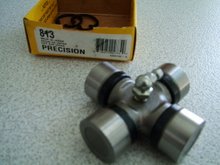
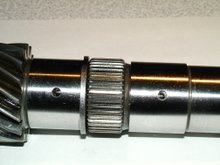
Drive shaft
The drive shaft felt OK when I bought the vehicle but with 170,000 miles on it, it would be better to take it apart and put some new U joints in it.
They actually still looked good, the grease was hard and black, there was some brinelling from the needles but it would have lasted a few more years. The rubber donut looked fine, so I just re-used it. You can still buy new ones, they are used by BMW on some of their older models.
I bought some new universal joints for it at Lordco, they are not listed under Vanagon Syncro but under PTO shafts, size is 27 mm x 70 mm. Before I paid for them, I checked with a small file if they were heat treated, a lot of u joints are soft and won't last at all. They came with a grease nipple and 2 circlip sizes so you can take the play out of them.
I had to machine the grease nipples so that they would screw in deeper, they won't fit as supplied.
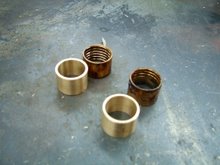
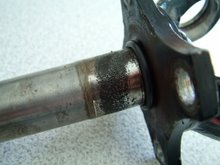
An often overlooked problem with the later style Syncro drive shafts are the bronze bushings that are located under the rubber donut, they wear out and cause vibrations in the drive line.To remove them, I put a thread into them, 1'' just fits, then used a piece of ready rod with nut, washers and a piece of pipe to pull them out.
Mine had a lot of wear and corrosion and I had to machine 0.035" off the shaft to clean it up, I made two new bronze bushings and pressed them back in the drive shaft. Next I fitted it all back together, I had to use the thicker circlips in order to get all the play out of the cups.
On the Syncro, it is important that the drive shaft is well aligned, both the tranny and the front diff flanges have an angle of about 4 degrees. If you do an engine conversion, and the engine hangs too low, you could end up with some vibration. Another thing to watch out for when doing a conversion is that the original VW engine is slightly offset towards the driverside, about 17 mm, if the new engine is installed in the center of the engine compartment, it will put another angle on the drive shaft that is not compensated for by the front diff and it may cause a vibration also. It is too bad that VW didn't put a CV joint in, one would have been enough.
On a two wheel drive Vanagon it is not that critical if the engine is centered, the axle CV joints will compensate for that.
Total cost for the U joints was about $ 80.00 and it took me 5 hours to machine the parts and put it all back together.
They actually still looked good, the grease was hard and black, there was some brinelling from the needles but it would have lasted a few more years. The rubber donut looked fine, so I just re-used it. You can still buy new ones, they are used by BMW on some of their older models.
I bought some new universal joints for it at Lordco, they are not listed under Vanagon Syncro but under PTO shafts, size is 27 mm x 70 mm. Before I paid for them, I checked with a small file if they were heat treated, a lot of u joints are soft and won't last at all. They came with a grease nipple and 2 circlip sizes so you can take the play out of them.
I had to machine the grease nipples so that they would screw in deeper, they won't fit as supplied.
An often overlooked problem with the later style Syncro drive shafts are the bronze bushings that are located under the rubber donut, they wear out and cause vibrations in the drive line.To remove them, I put a thread into them, 1'' just fits, then used a piece of ready rod with nut, washers and a piece of pipe to pull them out.
Mine had a lot of wear and corrosion and I had to machine 0.035" off the shaft to clean it up, I made two new bronze bushings and pressed them back in the drive shaft. Next I fitted it all back together, I had to use the thicker circlips in order to get all the play out of the cups.
On the Syncro, it is important that the drive shaft is well aligned, both the tranny and the front diff flanges have an angle of about 4 degrees. If you do an engine conversion, and the engine hangs too low, you could end up with some vibration. Another thing to watch out for when doing a conversion is that the original VW engine is slightly offset towards the driverside, about 17 mm, if the new engine is installed in the center of the engine compartment, it will put another angle on the drive shaft that is not compensated for by the front diff and it may cause a vibration also. It is too bad that VW didn't put a CV joint in, one would have been enough.
On a two wheel drive Vanagon it is not that critical if the engine is centered, the axle CV joints will compensate for that.
Total cost for the U joints was about $ 80.00 and it took me 5 hours to machine the parts and put it all back together.
Wednesday, February 21, 2007
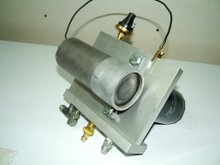
Decoupler
Since I had taken the VC out, I had to have a way to disconnect the front differential. The driveline will bind up quickly on dry paved roads and it becomes really hard to make a turn.
After some research on the web, I found out that there is a choice of two systems, one is like the original system used by VW and it is manufactured in South Africa, it looks like the strongest of the two. The other is made in the USA and uses the original splined sleeve that is in every Syncro, they added a bearing onto the sleeve which is moved by a shift fork.
It looked like I could make either one of them myself, the SA one would be the hardest to make,but I really liked the design.
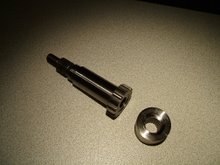
So I gave it a try, I got a piece of 4340 bar stock, machined it and put splines on it in the milling machine. I ended up making two of them, the first one I screwed up trying to heat treat it myself. Some things are best left to an expert.
The hardest part for me to make myself was the internal spline of the gear hub, I ended up using an old fashioned shaper with an index.
The sliding collar (the part that I thought would be the hardest to make) came from a Chev S10 front differential, it just fitted in the housing. I made a shift fork out of a slice of bronze bar stock, drilled the housing for the shift rod and electrical switch and made a bracket for the vacuum actuator.
I had the shaft and gear heat treated, pressed a needle bearing into the shaft and fitted it all together.
After some research on the web, I found out that there is a choice of two systems, one is like the original system used by VW and it is manufactured in South Africa, it looks like the strongest of the two. The other is made in the USA and uses the original splined sleeve that is in every Syncro, they added a bearing onto the sleeve which is moved by a shift fork.
It looked like I could make either one of them myself, the SA one would be the hardest to make,but I really liked the design.
So I gave it a try, I got a piece of 4340 bar stock, machined it and put splines on it in the milling machine. I ended up making two of them, the first one I screwed up trying to heat treat it myself. Some things are best left to an expert.
The hardest part for me to make myself was the internal spline of the gear hub, I ended up using an old fashioned shaper with an index.
The sliding collar (the part that I thought would be the hardest to make) came from a Chev S10 front differential, it just fitted in the housing. I made a shift fork out of a slice of bronze bar stock, drilled the housing for the shift rod and electrical switch and made a bracket for the vacuum actuator.
I had the shaft and gear heat treated, pressed a needle bearing into the shaft and fitted it all together.
Sunday, February 18, 2007
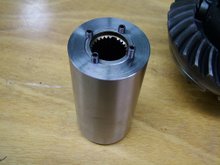
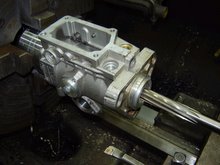
Locking front differential
I started out with the original front differential that had no diff lock, but looking at it a bit closer, I could see that the casting was prepared for a diff lock, all that had to be done was to bore out the housing on a milling machine, drill and tap the hole that holds the electrical switch and tap the two holes that hold the actuator on.
The diff carrier, fork, push rod and guide from a Syncro transmission will fit in there without modification, so I put the original ring gear onto a locking diff carrier that I still had from a core tranny, put new bearings in and set bearing pre-load and gear backlash.
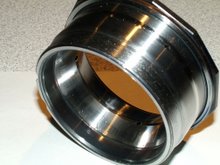
I also took the Viscous Coupling out, there was quite a bit of wear on the splines and I had noticed that the RH side front tire had a lot of cupping.
When it gets older, the VC gets hard, heats up and eventually fails, so I took the VC apart, cut the splines out of it and pressed these into a sleeve. Drilled 4 set screw in each end to prevent it from slipping and voila, a coupler.
Now without a VC you need a decoupler in the tranny, so I will cover this in a next post.
The diff carrier, fork, push rod and guide from a Syncro transmission will fit in there without modification, so I put the original ring gear onto a locking diff carrier that I still had from a core tranny, put new bearings in and set bearing pre-load and gear backlash.
I also took the Viscous Coupling out, there was quite a bit of wear on the splines and I had noticed that the RH side front tire had a lot of cupping.
When it gets older, the VC gets hard, heats up and eventually fails, so I took the VC apart, cut the splines out of it and pressed these into a sleeve. Drilled 4 set screw in each end to prevent it from slipping and voila, a coupler.
Now without a VC you need a decoupler in the tranny, so I will cover this in a next post.
Saturday, February 17, 2007
Brakes
The original brakes that come with the Vanagon are not very good, especially on the Syncro Westy, there is a lot of weight. There are South African Vanagon brakes that you can install, they take vented rotors but the piston size is still the same as the later type Vanagons.
I installed a set of later Audi 5000 turbo rotors with the Girling double piston calipers that came of the same car. You have to machine the caliper bracket to match the holes of the steering knuckle and use 8 mm thick spacers with M16 or 5/8 " bolts for this.
In the rear I have calipers from a 2004 Jetta VR6 or Audi A4, they take vented rotors. I have used 1985 Audi 5000 Quattro front rotors, they are 280x22mm. The calipers are mounted, by using an adaptor, to the bearing housing.
The brake hoses are from a 2004 Passat AWD, they use a banjo type bolt to connect it to the calipers.
Also, the rear hubs have to be machined down so that they fit inside the rotors. I had to go to a bigger wheel and longer studs, using 17" Audi S6 mags.
I am using synthetic brake fluid so I had to clean out all brake and clutch lines, it does't mix with regular brake fluid.
Once the van is on the road, I will check out the brakes to determine if the rear brakes lock up too easy on a wet surface, I may have to install a different pressure reducing valve.
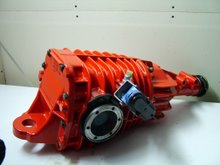
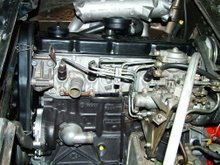
Transmission
When I bought the Vanagon, the seller told me that the transmission needed work, it was making grinding noises and popped out of gear.
Now the weak points of these transmissions are the 4th and 5th synchronizer body that cracks and breaks, it gets stuck in gear and is hard or impossible to get out. Also the double roller pinion bearing, main shaft bearing and 5th gear needle bearing run too hot and eventually will fail, especially if a more powerful engine is installed.
To improve the internal oiling of the bearings you can install plastic drip trays that were developed for the South African Vanagon that had a 5 cyl Audi engine, but still these tranny's absorb a lot of heat from the engine and eventually fail.
On my transmission, the synchronizer body was broken, main bearing split and housing scored.To improve the lubrication, I have drilled an oil channel through the housing to the double roller pinion bearing, cut a radial groove outside around the bearing with 3 small holes to the center of the bearing. Now it will have filtered and cooled oil pumped through the bearing center.
Also I have drilled an oil channel into the main shaft to the needle bearing cages of the 4th and 5th gears, put a spray nozzle on the main shaft bearing and one on the pinion.
External oil pressure is supplied by an extra power steering pump, that pumps the oil through an oil filter and then through a cooler into the tranny.You can see all the external pressure lines on the pictures.I hope that this will keep the tranny together for a long time.
To bring the engine revs down a bit, I have installed different 4th and 5th gears, they have nice big teeth on them, the original gears have very fine teeth and are known to fail. The new ratio's are: 1.14 : 1 third gear and 0.77 : 1 for the fourth gear.
The new engine
Labels:
Engine
I had been looking for a diesel engine to put in place of the 2.1 gas engine that comes stock in the later Vanagons. First I looked at the 1.6 and 1.9 Turbo Diesels, 1.9 TDI and 2.5 TDI.
The 1.6 TD is a bit low on power and the TDI's have too much electronics, I wanted to keep things simple, easy to repair and be able to run it on veggie oil.
I owned an Audi 5000 TD before and I really liked the 5 cylinder engine, it is based on the 1.6 TD, this engine revs fairly high, it's redline is about 5000 rpm, so this is comparable with the gas engine that it is replacing.
I started looking for one. Two months later I saw a 1983 Audi 5000 2.0 Turbo Diesel engine on Craigslist and picked it up in Olympia WA, the seller also had a SA bell housing to bolt this motor to the Vanagon Transaxle for sale for $175.00, so I bought this also.
After disassembling the engine, I found out that this engine had a lot of miles on it, I ordered 5 new pistons, had the block hot tanked and bored , rods re sized and crankshaft ground. The cylinder head had cracks between the valves, which is common, but the seats were corroded and needed to be replaced.
I milled out the cracks and welded the head, installed new seats, valve guides, valves and seals. Also, I installed a steel head gasket that is standard on the 2.4 Eurovan diesel. The head gaskets are a weak point on all early VW, Audi and Volvo diesels, so I am sure this will improve the reliability of this engine.
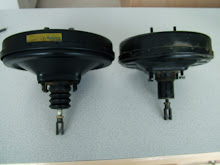
The Audi 5000 engine uses a vacuum pump that is bolted to the end of the cyl head to provide vacuum for the brake booster, this is driven by a belt. The problem is that it makes the engine longer and in order to set or check the injection pump timing, the pulley and belt have to be removed.
VW uses a diaphragm pump on the Eurovan diesels and it is run by a push rod that rides on a cam lobe. The whole pump is bolted to the side of the cyl head between the injectors.
I drilled all the mounting and push rod holes. So I got rid of a belt and ended up with more space in the engine compartment.
I powder coated all the sheet metal, and made a connector in the sump for an oil pre-lube pump.
Audi 5 and Volvo 6 cyl diesels have a history of engine wear during cold starts, the oil pump is located right behind the crank pulley, so it is a long way to the back of the engine.
To solve this problem, I have installed a pre-lube pump that takes oil from the crankcase, pumps it through an oil filter back into the engine. I took a 12volt pump that is normally used as backup on hydraulic brake boosters of trucks and school buses.
It is mounted on a thick aluminum plate that has internal oil passages drilled in it, I also added two VW spin on oil filters, one for engine oil and the other for transmission fluid.
The injection pump that came with this engine had a lot of shaft wear and this is probably the reason that it ended up for sale. It will suck a lot of air into the pump instead of fuel, it causes hard starts and loss of power.
It has two bushings in it that are about 3/4" apart. I made an one piece bushing out of bronze, pressed it in and machined it close to the size that it has to be, then reamed it to its final size.(17 mm on this pump)
Reseal kits are easy to get, bought mine on EBay for about $20.00, it includes all washers, O' rings and a shaft seal. It is not hard to install and should last me for years.
The 1.6 TD is a bit low on power and the TDI's have too much electronics, I wanted to keep things simple, easy to repair and be able to run it on veggie oil.
I owned an Audi 5000 TD before and I really liked the 5 cylinder engine, it is based on the 1.6 TD, this engine revs fairly high, it's redline is about 5000 rpm, so this is comparable with the gas engine that it is replacing.
I started looking for one. Two months later I saw a 1983 Audi 5000 2.0 Turbo Diesel engine on Craigslist and picked it up in Olympia WA, the seller also had a SA bell housing to bolt this motor to the Vanagon Transaxle for sale for $175.00, so I bought this also.
After disassembling the engine, I found out that this engine had a lot of miles on it, I ordered 5 new pistons, had the block hot tanked and bored , rods re sized and crankshaft ground. The cylinder head had cracks between the valves, which is common, but the seats were corroded and needed to be replaced.
I milled out the cracks and welded the head, installed new seats, valve guides, valves and seals. Also, I installed a steel head gasket that is standard on the 2.4 Eurovan diesel. The head gaskets are a weak point on all early VW, Audi and Volvo diesels, so I am sure this will improve the reliability of this engine.
The Audi 5000 engine uses a vacuum pump that is bolted to the end of the cyl head to provide vacuum for the brake booster, this is driven by a belt. The problem is that it makes the engine longer and in order to set or check the injection pump timing, the pulley and belt have to be removed.
VW uses a diaphragm pump on the Eurovan diesels and it is run by a push rod that rides on a cam lobe. The whole pump is bolted to the side of the cyl head between the injectors.
I drilled all the mounting and push rod holes. So I got rid of a belt and ended up with more space in the engine compartment.
I powder coated all the sheet metal, and made a connector in the sump for an oil pre-lube pump.
Audi 5 and Volvo 6 cyl diesels have a history of engine wear during cold starts, the oil pump is located right behind the crank pulley, so it is a long way to the back of the engine.
To solve this problem, I have installed a pre-lube pump that takes oil from the crankcase, pumps it through an oil filter back into the engine. I took a 12volt pump that is normally used as backup on hydraulic brake boosters of trucks and school buses.
It is mounted on a thick aluminum plate that has internal oil passages drilled in it, I also added two VW spin on oil filters, one for engine oil and the other for transmission fluid.
The injection pump that came with this engine had a lot of shaft wear and this is probably the reason that it ended up for sale. It will suck a lot of air into the pump instead of fuel, it causes hard starts and loss of power.
It has two bushings in it that are about 3/4" apart. I made an one piece bushing out of bronze, pressed it in and machined it close to the size that it has to be, then reamed it to its final size.(17 mm on this pump)
Reseal kits are easy to get, bought mine on EBay for about $20.00, it includes all washers, O' rings and a shaft seal. It is not hard to install and should last me for years.
Subscribe to:
Posts (Atom)