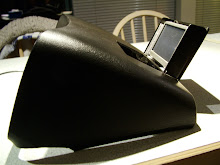
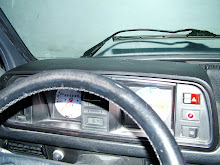
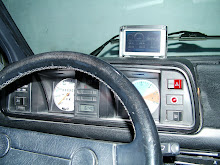
I made a place to store the Garmin GPS inside the instrument cover, it is a pain every time I park the van to take the GPS off the windshield and hide it somewhere so that it doesn't get stolen.
It was easy to make, I cut out an opening on the top of the right hand side of the instrument cover, then I made a frame from a piece of aluminium strip and glued and pop riveted it onto a piano hinge. Next was to cut out a lid of a spare cover so that it fits nicely in the opening and glued it on top of the alu frame. If you have no spare cover to cut it out off you will end up with slightly wider seams, which is OK.
Then I glued and pop riveted the hinge to the instrument cover and glued a small strip of material in so that the lid rests on it when it is closed. I then made a push button that will pop the lid up a 1/2 " so that I can grab it and open it up all the way.
To keep it open, I pop riveted a small arm on the bottom of the alu frame and put some industrial Velcro on it.
There is a small opening on the bottom to route the power wire through, I also drilled 6 small holes in the lid to let the sound out.
The glue that I have used is for repairing plastic bumpers, it sticks really well, the push button is made out of a Hilti concrete screw, it has a plastic liner that guides it, in the end of the screw, I have cut a small groove with the hacksaw and wrapped a thin copper wire around it to keep it from falling out.
The GPS is held in place with some Velcro strips on the back.
Now when I park the van, I just flip it down and it is out of sight.
Tuesday, December 15, 2009
Sunday, December 6, 2009
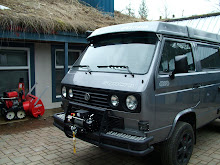
Almost done!
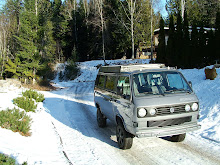
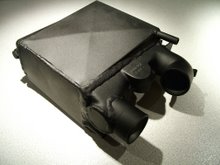
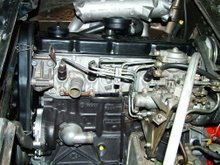
The van is almost together, the Westy interior is installed, exept for the fridge. The front seats, with seat heaters, are back in, new carpets in front, lino tiles in the back, radio installed, all windows have new rubber seals as well as all the doors. Rear windows are tinted, central locking, alarm installation, LED taillights and front turn signal lights. I am waiting for the new Yokohama Geolandar tires and the tire pressure monitoring system to come in that I will install at the same time. Still working on the front roof luggage rack that has the heat exchanger in it for the intercooler. Had the van outside today to let the engine warm up, watch the video.
Tuesday, September 8, 2009
New paint job
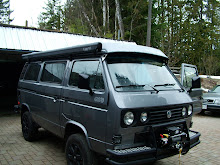
I just got the Syncro back from the body shop, I had done all the body work but I did not want to paint the van myself,I don't have a paint boot and I am sure that they do a better job than I can at home.
So now I am putting everything back in, new window seals, door rubbers, SA grille, bigger electric mirrors, front carpets, bigger fridge, new three window pop-up tent, solar panel etc.
I have converted the taillights and front turn signal lights to LED's and got some Bi Xenon HID lights for the front.
Painting the bumpers and installing the winch is next on the list.
Friday, June 12, 2009
G and Reverse synchronizer
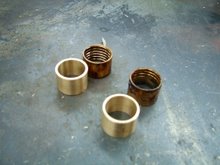
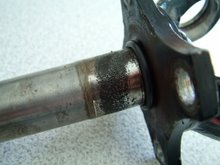
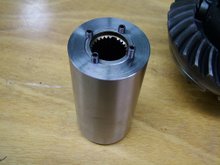
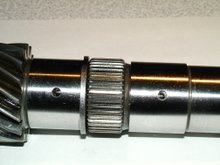
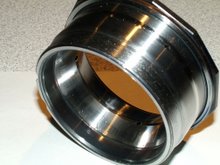
A problem that shows up in the Syncro gearbox after installing a TDI diesel is that the original bronze synchronizer rings get loose on the pins, which break and fall down in between the rotating gears.
They then end up smashing a hole in the transmission housing.
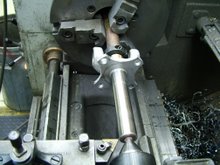
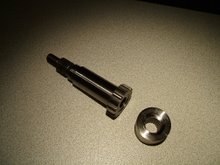
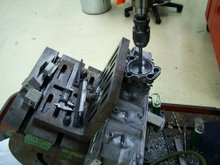
I made some stronger steel rings and brazed a bronze layer on, milled the grooves in the back side where the small springs fit in and finished the friction surface.
I then made a set of pins out of a special steel bolt and tapped internal thread in it.
The new steel synchronizer rings are then bolted to the pins with flat head Allan type bolts which have a tapered seat. I have put a small spot weld on it to prevent it from loosening itself.
I think that this problem is caused by the harsh vibrations of the TDI engine running without a dual mass flywheel, this causes the pins to loosen off in the softer bronze synchronizer rings and eventually it will break.
If you have problems shifting into Low or Reverse don't wait too long and take your transmission apart, it could self destruct within a 1000 KM.
Time will tell if this mod will work.
They then end up smashing a hole in the transmission housing.
I made some stronger steel rings and brazed a bronze layer on, milled the grooves in the back side where the small springs fit in and finished the friction surface.
I then made a set of pins out of a special steel bolt and tapped internal thread in it.
The new steel synchronizer rings are then bolted to the pins with flat head Allan type bolts which have a tapered seat. I have put a small spot weld on it to prevent it from loosening itself.
I think that this problem is caused by the harsh vibrations of the TDI engine running without a dual mass flywheel, this causes the pins to loosen off in the softer bronze synchronizer rings and eventually it will break.
If you have problems shifting into Low or Reverse don't wait too long and take your transmission apart, it could self destruct within a 1000 KM.
Time will tell if this mod will work.
Friday, April 3, 2009
Front winch bumper
Another project that I have been working on are the bumpers, I wanted to install a winch on the front bumper and for the rear bumper I needed a spare tire carrier, the 17" tire does not fit under the front where the original spare was.
I have used 2" pipe, elbows and caps for it.
There is a receiver hitch on the front bumper as well as the rear bumper, when I put the boat in the water, the muffler and lower part of the engine always ended up submerged and I was worried that it would stall, it is also a lot easier.
For the spare tire I made an arm that fits in between the two tubes and swings out of the way when I have to open the rear hatch.
Once finished, I'll paint both of them black with spay-on bed liner.
Auxiliary Heater
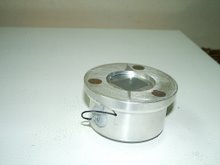
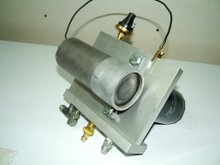
I have an Eberspacher BN2 auxiliary heater that ran on gasoline that I would like to use in the diesel Syncro, it came out of portable tool kit.
It is really hard to find glow plugs for these units, mine was broken, so I looked on Ebay and found one that I thought I could convert. It is a 12 volt unit compared to the 4 volt original one but in order to make it work I had to install a relais that supplies 12 volt to it.
The relais is triggered by the wire from the original glow plug.
I took the whole heater apart and lubricated the bearings, cleaned the points and checked the combustion chamber.
On the picture it shows it running, I adjusted the fuel pump for the right mixture and ran it all day, also to see if it stopped and started correctly on diesel fuel.
Runs great, I will just use a timer on it, no thermostat.
Sunday, February 15, 2009
Auxiliary fuel tanks
I installed the two auxiliary fuel tanks that I had made, after looking at how to fill the tanks, I thought the easiest way would be to put a T fitting on the original tank and have a small pump transfer the fuel into the left tank first until it is full and then through an overflow fill the right side tank.
If both tanks are full, it will overflow into a T connection on the filler neck back into the original tank. The other options would have been to put an additional filler neck where the 2 wheel drive version has it and then pump it into the other tank from there on, or to install a third filler neck on the driverside.
This pump is a vane pump that pumps about 5 gallon/min, so to fill both aux tanks should take about an extra 7 minutes.
Subscribe to:
Posts (Atom)