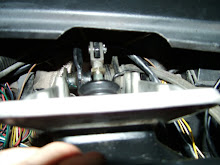
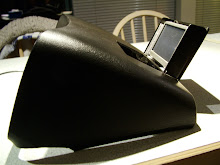
I made a place to store the Garmin GPS inside the instrument cover, it is a pain every time I park the van to take the GPS off the windshield and hide it somewhere so that it doesn't get stolen.
It was easy to make, I cut out an opening on the top of the right hand side of the instrument cover, then I made a frame from a piece of aluminium strip and glued and pop riveted it onto a piano hinge. Next was to cut out a lid of a spare cover so that it fits nicely in the opening and glued it on top of the alu frame. If you have no spare cover to cut it out off you will end up with slightly wider seams, which is OK.
Then I glued and pop riveted the hinge to the instrument cover and glued a small strip of material in so that the lid rests on it when it is closed. I then made a push button that will pop the lid up a 1/2 " so that I can grab it and open it up all the way.
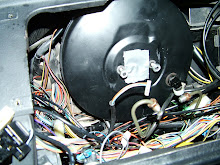
To keep it open, I pop riveted a small arm on the bottom of the alu frame and put some industrial Velcro on it.
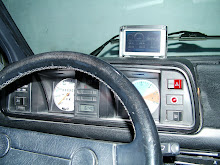
There is a small opening on the bottom to route the power wire through, I also drilled 6 small holes in the lid to let the sound out.
The glue that I have used is for repairing plastic bumpers, it sticks really well, the push button is made out of a Hilti concrete screw, it has a plastic liner that guides it, in the end of the screw, I have cut a small groove with the hacksaw and wrapped a thin copper wire around it to keep it from falling out.
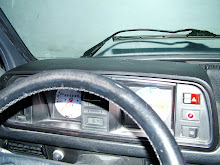
The GPS is held in place with some Velcro strips on the back.
Now when I park the van, I just flip it down and it is out of sight.
Tuesday, December 15, 2009
Subscribe to:
Post Comments (Atom)


7 comments:
Some serious stuff there!
Looking to get myself a vanagon to restore....nothing on that level though!
Great reading, good luck.
Brilliant idea for the GPS storage! Ingenious really. I'm wondering if you could show us how you plug the unit in.
My Garmin looks similar (if not identical) but the mounting bracket wraps around the backside of the unit and would make it stick out an additional 1/2" or more.
Also, is this wired to it's own dedicated 12v outlet that operates only when the ignition is on? This would make it incredibly simple to operate - just flip up and turn on. Thanks for sharing this one!
Hi, thanks.
I did not use the mounting bracket that came with the Garmin because I am using this GPS in my other vehicles too, I have a small opening in the bottom of the aluminium frame where the mini USB connector comes through and plugs into the bottom of the Garmin.
The connector that I have used has a 90 degree mini USB from a TomTom that I had and is hard wired to a power source that is hot when the ignition is on.
Later I noticed that Garmin uses this connector on some of their models as well.
The GPS is held in place by some strips of Velcro, so that I can take it out.
When I have time I will put up some more pictures.
Cheers, Herman
You are truly doing an amazing job with your project, I really enjoyed reading you over the last few months, maby you would enjoy takng a look at this new blog of mine; http://mysyncrostory.blogspot.com/ .
Cheers,
Simon
Hey Simon, thanks. Just looked at your blog, interesting Camper that you bought, looks really nice!
It sure hurts to see your previous Syncro, I hope that will never happen to me!
Was shipping expensive?
Cheers, Herman
I hope so to, I can tell you it's not a good feeling when you see your car like that... specially when you not the one who did it.
Shipping is not bad from Antwerpe in Belgium to Halifax it's 1250 euros. I asked for a quote to ship it here from Halifax and it was close to 2500$ so I will drive it here.
Simon
If you ever come in the Calgary area, let me know I want to show you something that you would find realy handy in a project like yours. It's called Richlite, it's a new countertop material that is seen in kitchens/bathrooms. It's black, waterproof soft enough to be machined with woodwork tools, you can drill it, tap it put it on a lathe and you dont need to finish it, bit like aluminium.
I have tons of cutoffs so if you interested I could give you a few pieces, you would love it.
Simon
Post a Comment